Sunday, December 28, 2014

A COLLAGE - PAINTING STEP-BY-STEP

A COOL COMBO FOR A MIXED MEDIA ARTWORK

Gauze and modeling paste together add
 major texture to any painting.

 Sure, there are many other materials you can use for similar effects: crackle paste, sheetrock compound, "molding" paste
or any of the texture pastes.
Here I'll show you every step of my method, beginning with a used canvas.  (I had collaged and painted an angel, but did not like the finished work.)
 
1. I gathered two images to add to the piece, and kept the angel. I veiled her thinly with a yellow ochre glaze. The three images balance each other.
collage, painting
Step 1, veiling and collage.


2.  I added thin glazes of acrylic color to the large figure and the tiny arch at top to blend them in better.
(Please excuse the quality of several of these pix!)

P.Guhin, mixed-media
Step 2, more veiling.

3. I adhered gauze to the canvas (in an arch shape) using acrylic medium, and then let it dry with a weight on top. 
tutorial, tute, how-to, art
Step 3, with gauze arch.


4. Next, when the gauze was dry, I scraped modeling paste into it. Let dry thoroughly.
acrylics, painting
Still not finished!


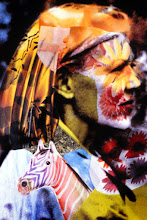
5. Finally, I used thin paints on the dry white arch and also adjusted the red cast. I then accented the entire piece to create contrast...light and dark in places. 
texture, technique
The finished artwork.
                        HAPPY NEW YEAR, EVERYONE!

Tuesday, December 16, 2014

AN EASY PROJECT (& more) FOR ANYONE!

HERE'S A QUICK, SIMPLE TECHNIQUE FOR MULTIPLE, DUPLICATE IMAGES OF DIFFERENT SIZES.

  • Print out the duplicates on a copier that creates different sizes , or use an image-editing program to make the sizes smaller or larger. 
  • ANOTHER IDEA: Make every other size lighter or darker, or positive vs. negative! You could even go color vs. grayscale for every other one!
  • Trim away the white edges of each image if desired, and arrange them on a sturdy background before you adhere them.
  • MORE IDEAS: Instead of symmetrical design and formal balance like my example below, try asymmetrical, informal balance in any number of ways. Here are a couple of former posts with more finished examples: digital collage! and another.
how-to, tutorial
Wire Chicken Basket with Eggs


Tuesday, December 9, 2014

USING A TRANSPARENCY AS SCRATCHBOARD

This project is not difficult at all, but the results are striking! 
  1. Print an inkjet photo that is high contrast, with many "white" and pure black areas. No gray to speak of! Print it onto an inkjet transparency.                                                                         
    transparency, Guhin
    A real scratchboard tool is great for this!
  2. Flip the transparency to the unshiny, printed side and improve the photo by scratching away some of the black areas. Great opportunity to add visual texture!                                                                                                                                                                        
    how-to, scratchboard, transparency
    Improving the inked side of the transparency.
  3. If some scratched areas need to be pure white for better contrast, rub a damp cloth over them to remove ink.                
    transparency, scratchboard, how-to
    Flipped over to the shiny, front side and ready for the next step!
  4. Next, let's add color to this thing. You COULD paint the back side with acrylics, as shown in this previous post. OR you can do it this way, with colored art paper!  Lay tracing paper over the front side of the transparency, and trace all the shapes that you wish to be colored.         
    Guhin, tutorial
    I'm tracing the mask shapes here, onto thin paper.


5. Use the tracing paper shapes in a sandwich to cut out colored art papers, and arrange the colorful shapes on a sturdy background the size of your transparency (or larger).          

collage, tutorial
I like warm and hot colors with black and white.
  
6. As you glue the colored paper to the background, keep checking  with your transparency that they are in position.  When they are dried in place, adhere the transparency (shiny side up of course) on top.  All done!
collage, tutorial, Guhin
Original photo and mixed media art copyright Paula Guhin


Tuesday, December 2, 2014

SHAVING FOAM AND COLLAGE ...A MIXED - MEDIA EXPERIMENT!

This one's as fun for adults as it is for kids! It's verrrry experimental, so be prepared to try several!
 
While you can use this technique to create collage papers, I skipped a step and used it directly on thick, absorbent paper upon which I had already collaged three butterflies.
First, allow the collage to dry well.
Next, use cheap shaving foam, not gel. Then spray the foam into a shallow container that's large enough for your collaged paper. (I used good, heavy journal paper and a baking pan.)
Spread the foam smoothly with a painting knife or scraper to make it rather flat.
I used a hodge-podge of alcohol inks, fluid acrylic paint, and even a waterbased spray paint to dot the surface with my colors of choice. Liquid watercolor also works!
 
how-to, Guhin
This is the shaving cream with inks and paints on it!
 
Swirl the colors a bit with a tool if desired. Then press the paper, images face down, into the foam. After a moment, lift and scrape off the foam to see your results.
 Note: You can use the foam again, adding more drops of color, unless it becomes "muddy".  Also, instead of a large pan,
you can place the foam on a big sheet
of Plexiglas.
collage, Guhin, technique
Can you find all three butterflies?

The winners of last week's
freebie contest
are followers
Pam Arthur &
Rebeca Trevino!
My thanks to both,
especially if they would
kindly send me (privately, of course)
their mailing addresses and preferences of prizes.