Sunday, February 23, 2014

Multi-Media Experiment & a Giveaway

A MIXED-MEDIA PAINTING & PHOTOGRAPHY
As a former 60s hippie at heart, I always adored the light shows. With some fluorescent spray paints and a squeeze bottle of glow-in-the-dark paint on hand, I just had to try my hand at a mixed-media artwork requiring my black-light bulb for display purposes.

First, I sprayed a large piece of heavy cardboard with Krylon neon paints in several fluorescent colors. I encouraged some drips, too!
black-light, multi-media
The pale-blue squiggles are glow-in-the-dark paint!
I had a roll of self-adhesive aluminum tape. It did have printing on it, but that turned out to be okay! Below is a shot of the tape and some shapes I cut from it.
neon, fluorescent


The flat shapes didn't adhere all that well, even though I allowed the background paint to dry first. But that, too, was ok!
Finally, at night in a dark room, with my blacklight nearby and on, I photographed the piece.
Paula Guhin, art blog
Hate it? Love it? Let me know!


Giveaway for my followers! This contest is now closed.
Are you a glitzy, sparkly person who would love to use these 5 DecoArt products (below)? Then be a follower of Mixed Media Manic and leave a comment below. From those, a winner will be chosen randomly when the contest closes. 
blog candy


Saturday, February 15, 2014

EASY COLLAGE TECHNIQUE - FAST & SIMPLE

MIXED MEDIA -- 
A GRAPHIC TRANSPARENCY
ADDS IMPACT
A bold, high-contrast black and white photograph  (without grays) is best for this method. Print the transparency.
Select text, smaller imagery, and other papers in keeping with your subject-matter. Arrange them on a sturdy background, auditioning the transparency before you glue down the background. Consider your composition.
Because a busy, dark collage beneath the transparency will be too, too much, you must lighten portions of the papers with a gesso- or pale gouache-wash, or use white pastel. Let dry. The transparency will have more graphic punch, more of an impressive effect, if the collage underneath  it  doesn't "fight" with it.
Use your own favorite method for attaching the transparency. Some people just glue it at the edges, while others affix it with scrapbooking findings or other means.
collage, mixed-media
From a book by Paula Guhin

Monday, February 10, 2014

Digital Collage or Hard Copies in Successive Sizes


What Lies Beneath 
Take your photographs to a completely new level—several, in fact. Build a layer cake, of sorts, with…um, layers! Besides working with digital images, you can even do this project with successively sized photocopies or enlargements of the same image, creating a collage.

technique, how-to
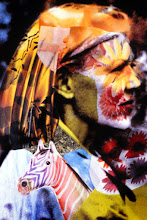
Photo copyright P. Guhin 

To Begin
It’s important to select a borderless photograph with graphic impact. Close-ups work well, as do longer shots with simple, empty backgrounds. A cluttered-up photo is too “busy” for this activity.
Lay It On
On a background of your choice (even a full page-spread of the featured photo itself), paste a copy of the image, scaled a bit smaller. Lose the rectangular format if you wish—the image can be square, oval, circular, even free-form! Adjust the brightness or tone of this second layer as needed, for better demarcation from the background.
 Center this photo or use informal balance. And now a word about that!
Balance
Combine the elements of a layout in a way that adds a sense of stability. Equilibrium can be achieved with symmetry or asymmetry.
 Symmetrical balance refers to a formal design in which the two halves of the piece mirror each other.
 An asymmetrical arrangement is informal and takes into account the visual weight of each part. For example, a large, pale shape on one side can be balanced with two small, dark shapes on the other side. Darker values appear “heavier.” The same holds true of bright, intense color—a spot of it goes a long way!
Build It Up
Repeat the process of pasting in another layer of the same image, scaled smaller than the previous one. If you wish to create an asymmetrical design, move this copy up, down, or to one side.
If you’re offsetting consecutively smaller images, you can either rotate each slightly or maintain a level appearance, whichever you prefer.

P.Guhin, photography, collage
Variety and Contrast
Be sure all your layers show up well. Desaturate every other layer (if the original image is in color), or adjust color balance differently in each layer. One cool option is to work from lighter to darker layers or the opposite. The possibilities are endless!
 If you’re using photocopies or printouts, set the copier or printer progressively lighter if desired, or use a different color of paper for each print.

Finally, if you wish, add text and any other embellishments in such a way that they do not interfere with the visual impact of your striking design.
 Do try this project—instead of a level playing field, play on a field of levels.

P.Guhin
Paula Guhin

Tuesday, February 4, 2014

COLLAGE WITH UPCYCLED PAPERS

Photomontage allows artists to splice together different images to make a statement. 

Photomontage began as a style of experimental photography in which the photographer makes a work of art by combining several different photographs. Before digital technology, this was often done with scissors and glue. The end result was then photographed and processed to get a seamless image. In modern times this may be easier to accomplish simply by using photo editing software. However, here we'll use the good, old-fashioned collage method!
collage, make, paper
Easy collage using scraps of bad photos.

Here's an easy one, above:
I cut strips with a paper cutter.
Vary the widths and lengths 
for added interest. Arrange
the pieces on a backing of
matboard, trying them every
which way until your composition is pleasing.
When you glue the pieces down, leave mosaic-like 
spaces if desired.
TIP: If you don't care for the color of the matboard, 
use a ruler and marker to change it!

create, lesson, tutorial
Another image from my new photo book!
 The collage above was also done with strips, but without any spaces between them. Too, I added a few short pieces to the top and bottom, and staggered the edges for even more interest.

The next project, below, is yet another lesson using discarded photo papers. My advice? If you don't have many reject-photos to create this type of collage, make it from magazine or scrapbooking papers.

PGuhin, tutorial
I used 3 different photos of the same subject here.
Note: some edges were torn rather than cut, to better tie in with the subject-matter. My background was an enlargement that seemed boring to me. Before adhering the extra pieces, I used a black marker on their edges for more contrast.

I think the finished piece is far more successful than the original photos were. 

Which of the three collages do you prefer, if any?

All of them (and so many
more ideas!) appear in 
this book, below, available

P.Guhin, Paula Guhintutorials, photos, photography


Sunday, February 2, 2014

KIDS' DRAWING ACTIVITIES FOR ART TEACHERS AND PARENTS, PART III

P.Guhin, art blog
Note how the shading adds depth to the leaf.
SKETCH A LEAF
Materials:
·        White drawing paper
·        Ballpoint pen or fine-line marker
·        A real leaf

BLOB-DOODLES
Materials:
·        Copy of the image below (or make your own)
·        Pencil and/or other drawing tools
            Have you ever gazed at clouds and imagined you could see the shapes of animals, people or more? We can get ideas for creating art from inkblots, too.
What to do:
  1. Study the blob-shape below and see what images come to mind.
  2. Turn the paper in different directions and discover the hidden figures, faces, animals, and objects you can draw there.
  3. Add details to the many pictures you find
Questions to Ask Yourself:
            Did you find a variety of things to draw? Variety is a principle of art that means “different, not all the same.” Did you fill all of the space well?
beginner, art, drawing
How many hidden images can you find here?

FABULOUS FOOTWEAR
Materials:
·        White drawing paper
·        Pen or fine-line marker
·        A shoe or pair of shoes

What to do:
1.      Shoes make a great subject for contour drawings. Place your shoe (or a pair of them) on the desk or table. Look very closely at the shoe, following all the edges with your eyes.
2.      With a pen or a fine-tipped black marker on a large sheet of paper, draw all the edges you see. No pencil allowed! Look back and forth many times between your paper and the shoe.
3.      Be sure to add the details—all the openings, seams, and designs. Remember to draw only lines! Since the shoe is not flat, your drawing should not be a strictly side view.      
Questions to Ask Yourself:
            Is your drawing complete? Did you include details such as laces, buckles, straps, stitching? If the proportions (relationship of the parts to one another) aren't quite right, try again on another sheet of paper.
                                                                          
NO PEEKING!
Materials:
·        White drawing paper
·        Pencil or other drawing tool
·        A “screen” such as a large book

            Blind contour drawings are practice sketches that are called "blind" because you can't look at your drawing until you're done! Contours are single lines that define forms. Blind contour drawings help train your eyes to see edges as you draw. They may look strange, but they'll help you become a better artist.
What to do:
  1. Choose an interesting subject.  Objects with lots of edges, folds, or other details are best for this exercise. Is there a person in the room who can pose for you?
  2. Set up a “screen” (a large book works well) in front of a large sheet of paper.
  3. Place your pen or pencil on your paper. You can look to make certain your starting point gives you enough room so you don't draw off the edge of the paper.
  4. Study the person or thing and draw very slowly. Don't look at your drawing! You are training your eyes to see and your hand to record every detail correctly. Don't lift your pencil or pen—just drag it around the paper when you need to draw a different shape.
For Your Understanding:
            Your finished drawing probably appears quite weird to you, but try several more blind contour drawings of the same object. It's good practice!

Saturday, February 1, 2014

ALTERED ART PROJECTS CREATED OF FOUND OBJECTS

 ASSEMBLAGE IS FUN & EASY! 
Your art materials can include such throwaway items as doll parts, wood scraps, broken toys, and so much more.
Here. just half of an old, damaged globe was used as the basis for a social statement in the round, so to speak.
altered, construction
Firecrackers helped emphasize the theme.
Here's another view of the same sculpture. 
mixed-media, sculpture, found objects
Toy money, caution tape, small toys, acrylic media.


Next up, a ceramic teapot (upended) served as the basis for a sculpture. 
P. Guhin, altered, assemblage
So simple to make!

The mouth? Halloween "teeth."


Finally, a rustic assemblage of old pieces of wood.
Primitive, yes, but striking as a wall-hanging.
art, activity, frugal
The "head" is a recycled heat gage.

art blog, mixed-media