Monday, June 25, 2012

The Book Is Out Now! See these artworks and SOOO many more!

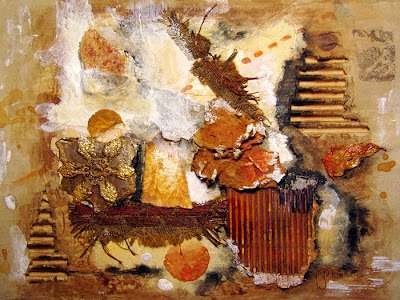
The first artwork, below, is a collage/painting that's almost entirely non-objective. The colors are mostly very neutral. Read more about it in Painting with Mixed Media, available now!

 
Painting with Mixed Media
Order the book here!


The collage/painting below is in the book, too! It was done using the grid system. Learn what materials went into this artwork when you read the book, which is loaded with tips, techniques, how-to's, step-outs, and lovely art to inspire.
 

abstract, art book, grid method
Another non-objective artwork!


Tuesday, June 19, 2012

MAKE A GORGEOUS ACRYLIC SKIN! How to Create a Swirly Embellishment

This lesson is so easy that even a child could make something beautiful! When it's thoroughly dry, use the acrylic skin as a collage element in a painting.

You will need :
  1. a disposable plastic or aluminum container 
  2. acrylic gel medium, glossy (thinned to a smooth, creamy consistency) or tar gel
  3. liquid acrylic colorants (I like airbrush colors)
  4. eyedropper or other tool to drip colorant
  5. feather or other tool to drag through

make a collage element, create a skin, marbleize, tutorial
Acrylic Skins are Easy to Make


Pour the acrylic medium into the container (I used the cover of a CD pack, since they are too nice to throw away!). 

Then drop the colors of your choice here and there. Use a brush, a bottle with a nozzle, or an eyedropper to place the drips.

Next, drag a tool through the medium, swirling the colors as you go. Do as much or as little marbleizing as you like. The acrylic medium dries quite clear, but it takes a day or three, so be patient, set the container aside, and wait.

I removed the circular shape I made quite easily when it was dry enough, by picking at one edge with a sharp tool and simply peeling it up. The shapes you make can be cut with scissors, too!

Monday, June 4, 2012

MIXED MEDIA TECHNIQUE FOR TEXTURE

Embedding textures on a canvas is a great way to create a rich, tactile surface!

1. A rigid substrate might be best. Cut thick paper into shapes, or used embossed paper. For this example, I used textured, paintable wallpaper. Or, instead of thick paper or cardboard, try heavily-textured cloth, buttons, or anything else you wish to incorporate.


texture, painting, collage
Steps 1 and 2


2. Glue the items to the support. Here I used a canvas that had been painted orange. Let the adhesive dry.


Collage, painting
Step 3


3. This step is where the "embedment" comes in. You may wish to blend in some of the edges of the pieces, to make the additions a real part of the background rather than simply pasted on. Apply molding paste or joint compound with a painting knife, softening some of the edges of the added pieces. Let dry before proceeding.


4. Paint a base coat of one or more colors, perhaps wiping some off here and there. I used acrylics. When that is dry, "antique" the piece with a dark wash or two, again wiping where desired. And/or drybrush some highlights back in to the artwork.

collage, painting
Step 4 Before Finishing
The finished work, at right below, is non-objective,
since there is no apparent subject matter, only pure color and shape.

texture, collage, acrylic painting
The finished collage painting looks very different now!


More posts about creating texture: http://mixedmediamanic.blogspot.com/2011/09/aluminum-tape-as-decorative-feature.html AND
http://mixedmediamanic.blogspot.com/2011/06/major-lightweight-texture.html AND
http://mixedmediamanic.blogspot.com/2010/12/fabulous-foil-technique.html